 Antica AI
Discovering a genuine antique treasure among countless reproductions and fakes requires a trained eye, systematic approach, and knowledge of key identification markers. Whether you're evaluating a piece at an estate sale, flea market, or online marketplace, understanding how to distinguish authentic antiques from modern reproductions is essential for any collector or enthusiast. This comprehensive guide will teach you the professional techniques used by appraisers and dealers to identify genuine antique treasures.
The Foundation: Understanding Authenticity Markers
Authentic antiques carry distinctive characteristics that reflect their age, manufacturing methods, and historical context. These markers are the fingerprints of authenticity—subtle but telling signs that separate genuine pieces from reproductions. Learning to recognize these signs requires patience and practice, but once mastered, they become invaluable tools in your identification arsenal.
No single marker guarantees authenticity. Professional appraisers examine multiple factors: maker's marks, construction methods, materials, wear patterns, and stylistic consistency. Always verify authenticity through multiple independent indicators.
The most reliable identification comes from cross-referencing multiple markers. A piece might have correct maker's marks but wrong construction methods, or appropriate materials but inconsistent wear patterns. The more markers align, the higher the confidence in authenticity.
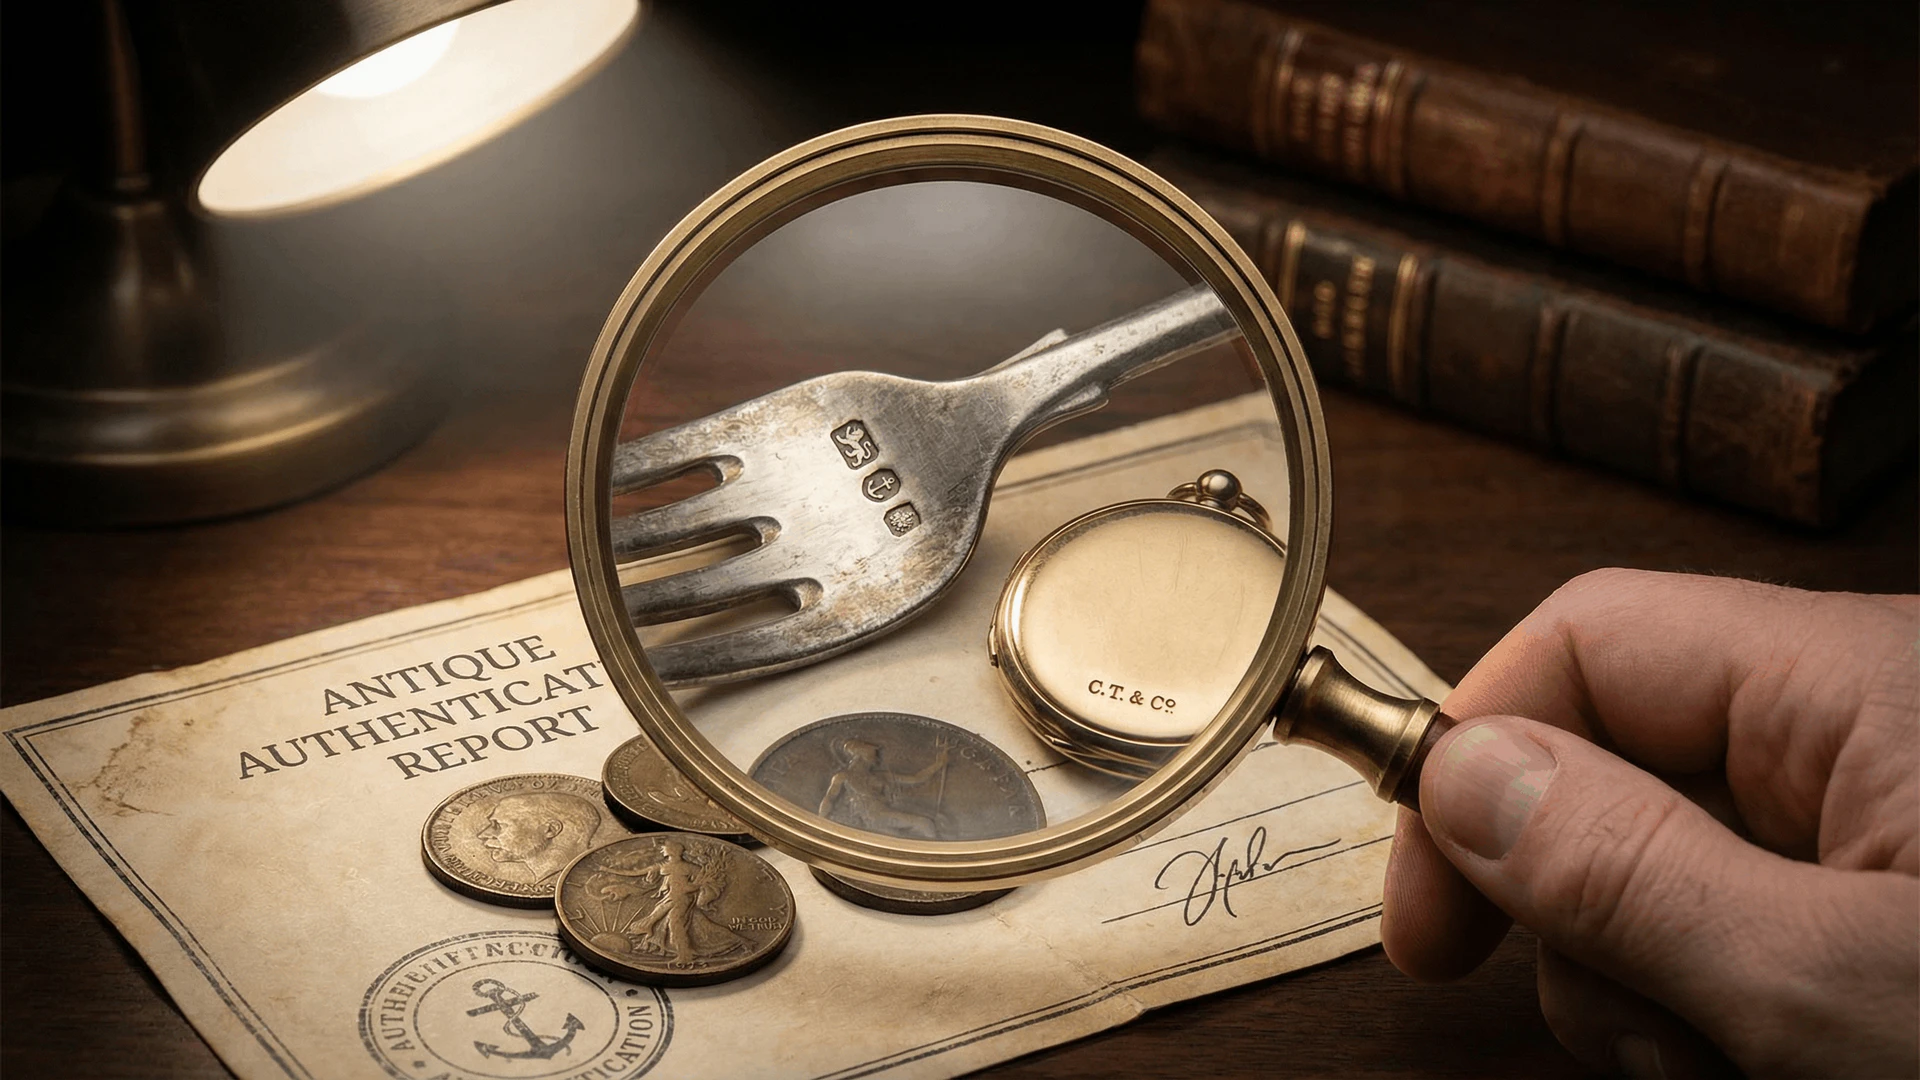
Maker's Marks and Signatures
Maker's marks, hallmarks, and signatures are among the most valuable identification tools, but they're also the most frequently faked. Understanding authentic marking systems is crucial:
Silver and Precious Metals
Silver items carry hallmarks indicating purity, maker, and often date. British silver uses a complex system of symbols including lion passant (sterling), date letters, and maker's marks. American silver typically shows "STERLING" or "925" along with maker initials. Learn the hallmark systems for different countries and periods—reproductions often have incorrect or missing marks.
Furniture Makers
Many furniture makers signed their work, but signatures vary by period and region. Early American furniture (pre-1800) rarely had signatures, while Victorian-era pieces often included paper labels. Chippendale, Hepplewhite, and Sheraton pieces were rarely signed—if you see a signature on what's claimed to be an 18th-century piece, be suspicious.
Ceramics and Porcelain
Pottery marks evolved significantly over centuries. Early pieces often had no marks, while later periods used specific symbols, numbers, and maker names. Chinese porcelain marks can be particularly tricky—many pieces bear reign marks from earlier dynasties as a sign of respect, not authenticity.
According to authentication experts, approximately 40% of items submitted for appraisal have incorrect or misleading marks. The most common issues: modern reproductions with period-appropriate marks, items with marks from wrong periods, and authentic pieces with added fake signatures to increase value.
📺 Watch Videos: Understanding Antique Maker's Marks
Construction Methods: The Unforgettable Fingerprint
Construction techniques reveal age more reliably than almost any other marker because they're extremely difficult to fake convincingly. Each historical period used specific methods that reflect available tools, technology, and craftsmanship traditions.
Furniture Construction
Examine joinery carefully. Hand-cut dovetails show irregular spacing and slight variations—machine-cut dovetails (used after 1860) are perfectly uniform. Hand-forged nails have irregular heads and shanks, while machine-made nails (after 1790) are uniform. Screws weren't commonly used in furniture until the mid-1800s—if you see screws in what's claimed to be 18th-century furniture, it's likely a reproduction.
Metalwork Techniques
Early metal items show hand-hammered marks, irregular thickness, and evidence of hand filing. Cast items from different periods show distinct casting marks and finishing techniques. Welding methods changed over time—early pieces used forge welding, while modern reproductions often show electric welding marks.
Textile and Fabric Analysis
Hand-woven fabrics show slight irregularities in thread count and pattern alignment. Machine-woven fabrics (common after 1800) are perfectly uniform. Early textiles used natural dyes that fade differently than modern synthetic dyes. Examine seams—hand-sewn seams show irregular stitches, while machine-sewn seams (after 1850) are perfectly uniform.
Be suspicious of items that show mixed construction methods—for example, hand-cut dovetails with modern screws, or hand-forged nails with machine-cut joints. Authentic period pieces show consistent construction methods throughout.
Material Analysis: What's Inside Matters
Materials used in antiques reflect their historical period, available resources, and manufacturing capabilities. Understanding period-appropriate materials helps identify authentic pieces:
Wood Types and Usage
Different periods favored different woods. Early American furniture (pre-1800) used native hardwoods like oak, maple, and cherry. Mahogany became popular in the 1700s but was expensive—if you see mahogany in what's claimed to be a common household item from 1650, question it. Plywood wasn't invented until the 1850s—any piece claiming to be older shouldn't contain plywood.
Metal Composition
Early brass contains different alloy ratios than modern brass. Lead content in pewter changed over time—early pewter has higher lead content. Silver purity standards varied by country and period. Use a magnet—real silver and gold aren't magnetic, but many fakes contain iron.
Glass and Ceramics
Early glass shows bubbles, irregularities, and often a slight green or blue tint from iron impurities. Modern glass is perfectly clear. Ceramic glazes evolved significantly—early glazes show crazing (fine cracks) and color variations that are difficult to replicate authentically.
A collector purchased what appeared to be an 18th-century mahogany chest for $3,500. Upon examination, they discovered plywood construction (not used until 1850s), modern screws, and synthetic wood stain. The chest was actually a 1950s reproduction worth about $300. This highlights why understanding materials and construction methods is essential.
📺 Watch Videos: Antique Construction Methods Explained
Wear Patterns: The Story of Use
Authentic wear tells a story that's difficult to fake convincingly. Understanding natural wear patterns helps distinguish genuine antiques from artificially aged reproductions:
Natural Wear vs. Artificial Aging
Natural wear occurs in specific areas based on how items were used. Chair seats show wear on sitting surfaces, not uniformly everywhere. Drawer handles show wear where fingers gripped them, not random scratches. Authentic patina develops over decades—it can't be rushed or perfectly replicated.
Patina Development
Patina—the natural aging of surfaces—develops through oxidation, handling, and environmental exposure. Wood patina shows gradual darkening in exposed areas. Metal patina shows oxidation patterns that match age and use. Reproductions often have uniform "aging" that looks artificial—too perfect or too random.
Damage Patterns
Old damage tells a story. Cracks in ceramics follow stress points and show age in the crack itself. Repairs done decades ago show different materials and techniques than modern repairs. Multiple layers of old repairs indicate genuine age.
Stylistic Consistency: Period-Appropriate Design
Design elements must match the claimed period. Anachronistic features—design elements from wrong time periods—are red flags:
Furniture Styles
Each period had distinct design characteristics. Chippendale furniture (1750-1790) shows specific leg styles, carving patterns, and proportions. Victorian furniture (1837-1901) has different characteristics than Georgian (1714-1837). Learn the key features of each major style period.
Decorative Elements
Ornamentation changed significantly over time. Early pieces show hand-carved details with slight variations. Later periods used machine-made decorative elements. Motifs and patterns reflect their historical periods—Art Deco motifs (1920s-1930s) look very different from Victorian motifs.
Proportions and Scale
Furniture proportions changed with lifestyle and manufacturing capabilities. Early pieces were often smaller and more functional. Later periods emphasized ornamentation and larger scale. Reproductions sometimes mix proportions from different periods.
📺 Watch Videos: How to Spot Fake Antiques
Tools for Identification
Equipping yourself with the right tools makes identification more accurate and efficient:
Magnification Tools
A good magnifying glass or jeweler's loupe (10x to 20x magnification) is essential for examining marks, construction details, and wear patterns. Look for irregularities in marks, tool marks in wood, and details in metalwork that reveal manufacturing methods.
Lighting Equipment
UV light helps identify repairs, restorations, and modern materials—many modern glues, paints, and materials fluoresce differently than period materials. A strong flashlight helps examine interiors, joints, and hidden areas.
Testing Tools
A magnet helps test metals—real silver and gold aren't magnetic. A small file can test metal hardness (with caution). Chemical tests can identify materials, but should be done carefully and only when necessary.
Digital Tools
High-resolution photography helps document details for later research. Apps like Antica AI can provide quick identification assistance and historical context. Online databases help verify marks and compare similar pieces.
📺 Watch Videos: Essential Tools for Antique Identification
Systematic Examination Process
Professional appraisers follow a systematic process to ensure nothing is missed. Adopt this approach for consistent results:
Step 1: Initial Visual Assessment
Start with overall appearance. Does the style match the claimed period? Are proportions appropriate? Does the condition match the claimed age? Look for obvious red flags before detailed examination.
Step 2: Mark and Signature Examination
Use magnification to examine all marks carefully. Compare marks to reference sources. Verify that marks match the claimed period and maker. Check for signs of added or altered marks.
Step 3: Construction Method Analysis
Examine joinery, fasteners, and construction techniques. Look inside drawers, under tables, and in hidden areas. Verify that construction methods are consistent and period-appropriate.
Step 4: Material Verification
Identify materials used. Verify that materials were available in the claimed period. Check for modern materials that shouldn't be present. Test metals when appropriate.
Step 5: Wear and Patina Assessment
Examine wear patterns for authenticity. Verify that patina matches claimed age. Look for signs of artificial aging. Check for repairs and restorations.
Step 6: Cross-Reference and Verification
Compare findings with reference materials, databases, and similar authenticated pieces. Verify that all markers align. Document any inconsistencies or concerns.
Common Identification Mistakes
Avoid these common errors that lead to misidentification:
1. Relying on Single Markers
Never base authentication on a single factor. A correct maker's mark doesn't guarantee authenticity if construction methods are wrong. Always verify multiple independent markers.
2. Ignoring Inconsistencies
If something doesn't add up, investigate further. Inconsistencies are red flags—don't ignore them hoping they'll make sense later. When in doubt, consult an expert.
3. Overvaluing Condition
Perfect condition isn't always a good sign. Some authentic antiques show significant wear, while many reproductions are in suspiciously perfect condition. Condition must be evaluated in context.
4. Assuming Price Indicates Authenticity
High prices don't guarantee authenticity—many fakes are sold at premium prices. Low prices don't necessarily indicate reproductions—many authentic pieces are undervalued. Price should be evaluated separately from authenticity.
5. Skipping Hidden Areas
Always examine interiors, undersides, and hidden areas. Many identification markers are found in places sellers don't expect you to look. Drawer bottoms, chair undersides, and interior surfaces reveal crucial information.
When to Seek Professional Help
While learning identification techniques is valuable, some situations require professional expertise:
- High-value items: For pieces worth over $1,000, professional authentication is recommended before purchase.
- Conflicting markers: If some markers suggest authenticity but others don't, consult an expert.
- Unfamiliar categories: When evaluating items outside your expertise, professional help prevents costly mistakes.
- Insurance purposes: Most insurers require professional appraisals for valuable items.
- Legal matters: For estate planning, tax purposes, or legal disputes, professional authentication is essential.
Building Your Identification Skills
Becoming proficient at antique identification takes time and practice. Here's how to develop your skills:
Study Authenticated Pieces
Visit museums, reputable dealers, and auction houses to examine authenticated pieces up close. Learn what authentic pieces look and feel like. Develop a mental library of authentic characteristics.
Practice Regularly
Examine items regularly, even if you're not buying. Practice identifying markers, comparing pieces, and evaluating authenticity. The more you practice, the better you'll become.
Build Reference Library
Invest in reference books specific to your collecting interests. Study maker's marks, construction methods, and stylistic characteristics. Online databases supplement books but shouldn't replace them.
Learn from Mistakes
Every collector makes mistakes—learn from them. Analyze what you missed, why you misidentified something, and how to avoid similar errors. Mistakes are valuable learning opportunities.
Conclusion: The Art of Identification
Identifying antique treasures is both science and art—it requires knowledge of historical facts, technical understanding of manufacturing methods, and the ability to recognize subtle patterns and inconsistencies. No single technique guarantees success, but combining multiple identification methods provides reliable results.
Remember that even experienced professionals sometimes struggle with difficult pieces. When in doubt, seek expert opinion rather than risking significant investment on uncertain items. The goal isn't to become infallible, but to develop skills that help you make informed decisions and avoid costly mistakes.
As you develop your identification skills, tools like the Antica AI app can provide valuable assistance, offering quick identification, historical context, and comparison with similar pieces. However, technology should complement, not replace, your developing expertise and understanding of authentic antique characteristics.
📺 Watch Videos: Expert Guide to Antique Identification
Ready to Identify Your Antique Treasures?
Identifying authentic antiques can be challenging—how do you know if a piece is genuine? What markers should you look for? The truth is, authentication requires examining multiple factors: maker's marks, construction methods, materials, and wear patterns.
An item showing consistent period-appropriate construction, authentic maker's marks, and natural wear patterns is more likely to be genuine. However, even experienced collectors sometimes struggle with difficult pieces, especially when markers conflict or items are outside their expertise.
Feeling uncertain about that estate sale find or curious about items in your collection? Antica AI is like having an antique expert in your pocket. Just snap a photo to get instant identification, historical context, and estimated value—turning your questions into confident answers.
Download Antica AI